|
|||||||||||||||||||||||||||||||||||||||||||||||||||||||||||||||||||||||||||||||||||||||||||||||||||||||||||||||||||||||||||||||||||||||||||||||||||
|
|||||||||||||||||||||||||||||||||||||||||||||||||||||||||||||||||||||||||||||||||||||||||||||||||||||||||||||||||||||||||||||||||||||||||||||||||||
|
Artillery Tutorial and Test Results
Artillery is one of the most underrated weapons in the Steel Battalion: Line of Contact game. It is not suited for use on all maps, and requires teamwork and strategy to use properly. Below I will discuss the various artillery options, present some test results from artillery weapon usage, and give cursory tutorial details regarding the usage of howitzer type weapons in combat. Howitzter Capable VTs
** The AVTGM is included here due to its indirect fire capabilities, however, the minimal impact area makes this weapon extraordinarily difficult to use in a manually aimed capacity. The damage per salvo is also less than most of the traditional howitzer class weapons. Weapon Statistics
Splash Damage Effect
Howitzers have an area-of-effect splash damage effect which allows them to inflict damage on surrounding terrain or targets even if a direct hit cannot be achieved. The splash damage area increases in diameter with heavier artillery weapons. Reference the Weapons Statistics table above for Blast Radius values. Direct hits with a howitzer weapon do 100% of possible damage total, all other splash damage in the blast area is taken at 30% of normal values. Reference the graphic below: 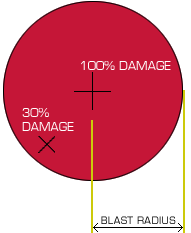 Direct hits may only be achieved if the howitzer shell impacts directly over the "body area" of a target VT, if the shell impacts even 5m outside the "body area" it is considered splash damage and applied at 30% normal value. You may compare the various artillery targetting puck sizes by referencing the following images.
Time-to-Target
When fired, a howitzer projectile follows a parabolic high-arc course to the selected target area. The distance from the origin VT to the target area determines the arc of travel for the projectile, as well as the time to impact. Test values are given below for time-to-target for each howitzer type as it relates to distance.
The path a howitzer projectile follows is related the distance of the intended target impact zone. Distant targets result in a shallow arc projectile path which can be problematic when operating in mountainous or canyon terrain with high obstructions. Reference the illustration below for a representation of the arc differences for near and distant targets. 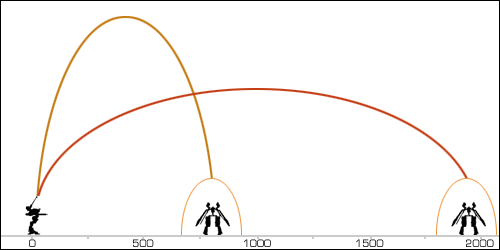 A low arc trajectory can result in the howitzer round impacting on terrain obstructions while en-route to target even if the target would normally have been within the effective range of the howitzer. 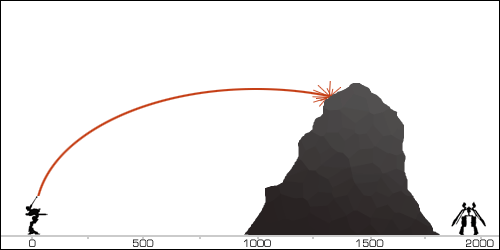 In order to successfully attack targets behind tall barriers, an artillery equipped VT may need to move closer to the barrier to allow for a higher arc trajectory. 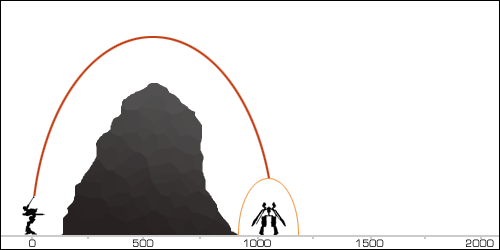 Escape Velocity
Based on the area splash damage and time-to-target elements from above, the necessary escape velocity for a target VT can be calculated for each weapon. This is the minimum velocity that a VT must be travelling at in order to escape the splash damage effect of a howitzer round fired at their current position at a given distance.
Artillery Tutorial
Know When to Deploy Artillery
One of the most important things to understand when considering the deployment of artillery (support piloting) is to make sure the tactical environment is appropriate to do so. Determining this will come with experience, but a few general guidelines should be mentioned:
Mission 04 - Occupation of Highland 33 - Mountainous canyon environment is ideal for defenders with artillery. Attackers can get in on the action with artillery of their own. Mission 10 - Jacalita Woodlands - This waterlogged swamp mission is ideal for prospective support pilots. Generally, targets are limited to lower gear velocities by the numerous water crossings and limited dry land, making for easy artillery pickings. Mission 14 - Wei Gu Strike - Steep canyons make good opportunities to concentrate artillery fire and create chokepoints for both attackers and defenders. Mission 19 - Yun Kota Gorge - Possibly the best artillery map in the whole game. Numerous water crossings and steel hill climbs keep enemy targets from escaping at speed. Mission 23 - Er Ting Foothills - The hilly terrain is conducive marker/artillery strategies. Several of the hills have "hidden" platforms which can be used as ideal artillery locations. There are some maps which are nearly impossible to effectively pilot support VTs in. It's not to say that artillery can't be used, only that it is more difficult than usual to use it effectively. Mission 00 - Live Ammunition Training Grounds - Available only in Free Mission, this flat terrain map allows targetted enemies to escape incoming artillery too easily. Mission 07 - Battle of Jian Da Harbour - The continuous pavement and broad open areas of this map allow for easy escape from incoming artillery rounds. The caveat here is using artillery to attack the battleship (main objective) as it will go down after taking 30,000 points of damage. Mission 11 - San Kuchen Subterranean Fortress - Indoor maps do not allow enough room for artillery. Mission 15 - Container Extraction - Indoor maps do not allow enough room for artillery. Mission 17 - New Nan Jian Factory - Indoor maps do not allow enough room for artillery. Support Piloting Overview
Artillery weapons are targetted using the map overview display of the cockpit Multi-Monitor. Each artillery weapon has a targetting "puck" that shows the area of effect and location that an artillery round will land if fired. Generally, achieving "direct" hits is very difficult because targets tend to be in-motion when fired upon, however, splash damage can be very effective over time, as well as the added effect of ingited fires in the enemy VT hull. 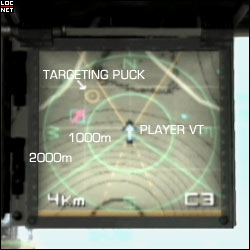 The artillery puck is positioned using the Aiming Lever on the Right Block. Pushing the Aiming Lever "forward" will bring the artillery puck "down" on the Multi-Monitor map, which translates to "closer" to the source VT. Pulling the Aiming Lever all the way "back" will move the artillery puck forward from the current VT position. Note that the artillery puck has a limited area in which it will move, which corresponds to the "effective range" of the artillery weapon selected, which for all howitzers is 800m minimum to 2000m maximum for the "direct hit" area. Depending on the artillery weapon chosen, there is a splash damage area to either side of the minimum/maximum range equal to the radius of the targetting puck. This can allow for an effective range between 450m and 2350m when the splash damage area is included. 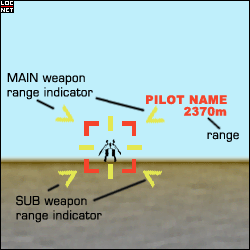 When a target is locked, the targetting reticule will display the pilot name, range to target, and visual indicators for effective range of MAIN and SUB weapon systems via two pairs of arrows above and below the targetting reticule. The upper pair of targetting arrows represents the MAIN weapon effective range, the lower pair represent the SUB weapon effective range. The arrows will converge toward the center top and bottom respectively as the VT is brought into range. 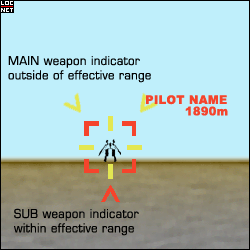 Once the effective range for a weapon has been reached, the targetting reticule indicators will converge to a single red arrow above or below the target. 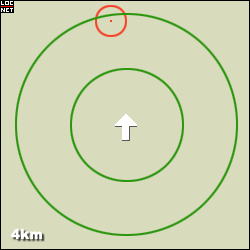 The targetting puck on the Multi-Monitor will automatically position itself to the locked enemy position even though the enemy VT will not show up on the radar display (unless marked as discussed below). I find that the second magnification setting for the Multi-Monitor view is the best for positioning of artillery as it covers the entire effective range of howitzer weapons. You can change the magnification view setting of the Multi-Monitor by pressing the MODE SELECT button for the Multi-Monitor on the right block of the controller. Although a HIT may be achieved using a manual lock in the above method, most targets are mobile and can often escape from under the target area from the time the artillery round is fired to the time the shell impacts in the target zone (see the above chart for necessary escape velocities). If an enemy target is moving slowly due to hill climbing or crossing water a manual lock will usually result in a positive HIT, but on flat terrain where an enemy can achieve 5th gear WHEEL mode, a support pilot must utilise manual, unlocked aiming techniques to hit their targets. See below for a discussion of this topic. Working with Marked Targets
Having marked targets greatly simplifies locating and placing artillery shells. That said, there is still some skill involved in predicting the movement of a target on radar and the placement of the artillery targetting puck to "lead" a shot onto an enemy VT. When marked, enemy VTs will show up on the Multi-Monitor map display for two minutes as a glowing red arrow. The direction faced is shown on the monitor and the target velocity can be inferred from the movement of the marked target arrow. 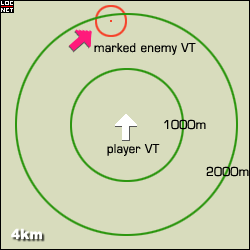 There is no specific calculation that can be given to determine "exactly" where to place the artillery puck in order to lead a moving marked target. However, estimations based on likely maximum speed of a given VT and time-to-target (see above table) for an artillery round launched at a given range can be made. Let us take the following as example:
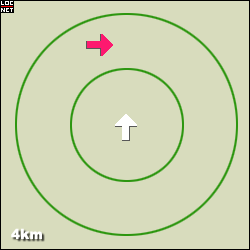 At 1500m, a 370-HW round will take approximately 7 seconds to reach the target zone. In 7 seconds, the Decider traveling at 140km/hr will cover 272m. The math for this is displayed below: 140km/hr ÷ 60min ÷ 60sec x 1000m = 38.8m/sec x 7sec = 272m Of course, this calculation is for example purposes only, in a real combat scenario, rough estimations and experience are the primary keys to success. 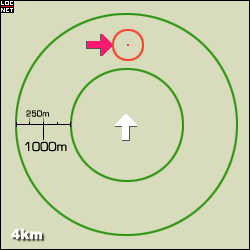 Since the second magnification view of the Multi-Monitor shows ring markers for the 1000m and 2000m distances, estimations of range and distance can be made as fractions of the viewed area. In practise, I find that leading a moving target by placing the "edge" of the targetting puck against the tip of the marked target arrow tends to give a high percentage of hits, without any kind of mental calculation. Working with Unmarked Targets
Unmarked targets are much more difficult to successfully get hits on with without a manual lock. Manually aiming "freehanding" howitzer rounds onto moving targets is a skill that is only developed over time and with experience. Below I will cover a few tips that have helped me develop as a support pilot, but I make no claims of mastery! As I mentioned above, the Multi-Monitor gives you a rough visual estimation of range with regard to your surroundings on a map, and you can use this information to assist in successfully targeting artillery. For example, sweeping the targeting reticule (not the artillery puck) over the horizon is one of the best ways to locate enemy units. Even without a lock, hovering the reticule over an enemy VT will give the range information. 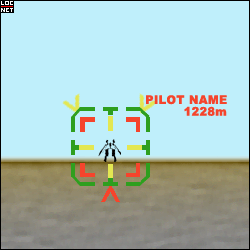 In the image above, the enemy VT would be at 1228m from the player VT. 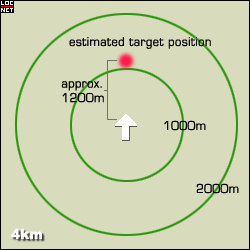 If the target is moving, estimations of direction and velocity will also have to be taken into account. A variant on the above tactic involves actually locking onto an unmarked target briefly to allow the Multimonitor view to display the current position and direction of travel for the enemy unit based on the artillery puck. After a quick refernce on the Multimonitor for range and direction, the target is then unlocked and the artillery puck then positioned at the estimated coordinates to get a HIT (accounting for target movement and time-to-target for the artillery shell). This tactic is particularly effective when the game is experiencing high latency and maintaining a reticule "hover" on an enemy is difficult. Terrain features can also be used to help position artillery targeting. Visual cues or communicated positions from team mates can also assist. Other in-game cues to enemy positions include bases changing colour from being captured or neutraled. 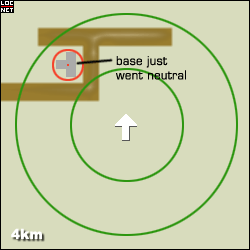 An additional tip would be to use the Missile Camera and Live Camera options on the Sub-Monitor display to assist with target location. In particular, the Missile Camera can be very useful for pinpointing targets around the impact zone of an artillery round, allowing corrections to be made based on the location of enemy units. To get a better view of the Missile Camera, press the F3 button on the Center Block of the controller to "lean in" to the Sub-Monitor. Similarly, the F2 button can be pressed to lean in to the Multi-Monitor if a clearer view of the terrain map is required. |
|||||||||||||||||||||||||||||||||||||||||||||||||||||||||||||||||||||||||||||||||||||||||||||||||||||||||||||||||||||||||||||||||||||||||||||||||||


