|
|||||||||||||||||||
|
|||||||||||||||||||
|
Vertical Tank Customisation Guide
Startup Sequence
It seems very obvious, but a VT isn't going to go anywhere unless it is properly started. VTs initialise in a powered down mode with the cockpit open, as in Figure 01. To close the cockpit, press the COCKPIT HATCH button. This button only has to be pressed once the first time a VT is brought online. If for some reason a VT is shut down, the cockpit remains closed. Pressing this button again during a mission will not re-open the cockpit. After the cockpit is fully closed, it appears as in Figure 02. To bring main power online and initialise the primary system diagnostics, press the IGNITION button. The display will cycle through the VT OS boot display (Figure 03) and finish with the Primary Systems Check prompt (Figure 04). Each of the subsystem toggle switches are then set to on (Figure 05), and the OS performs several system self-checks (Figure 06). As the systems come online, the various joint governors in the VT build power (Figure07). All joint governors must be working at 70% or greater (Figure 08) to enable a control lock. The lock is triggered by pushing the START button (Figure 09). At this time the Vertical Tank is capable of movement. The startup sequence duration varies depending on VT generation and pilot proficiency. Movement, Torque and Shifting Gears
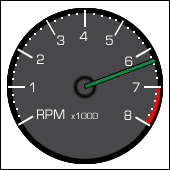
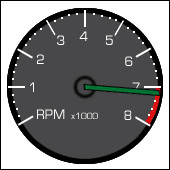
Movement is accomplished by pressing on the ACCELERATOR pedal on the foot block, in combination with the correct gear selected with the GEAR SHIFT LEVER. Vertical Tanks use a manually engaged gearing system to maximise torque efficiency and control over varying terrain. Gears 1 - 4 are forward motion gears, with N being Neutral (disengaged) and R being Reverse. 5th gear enables "WHEEL" mode which allows a VT to traverse flat or downhill terrain rapidly. Shifting between gears is very similar to the method used by manual transmission automobiles. Sufficient torque needs to be built up to allow shifting to the next higher gear. For this reason, the Torque Meter is one of the more important displays in the VT cockpit. Its location varies slightly depending on generation and combat class, but it is generally located on the bottom right-hand side. A full cockpit reference is available here.
Shifting "up" through gears should only be done when the torque meter passes 7000rpm. Shifting earlier than this will result in poor (or a decrease in) acceleration. In the case of WHEEL mode, speed will rapidly drop and torque will be lost.
The direction of movement is controlled by the ROTATION LEVER on the LEFT BLOCK of the controller, which is limited to an X-axis (right or left) movement only. Different model VTs have varying turn rates. Slidestepping
In addition to standard movement, Vertical Tanks have a supplementary damage avoidance capability which is accessed via the slidestep pedal on the foot controller block. When triggered, the VT will dash quickly in the direction of movement and/or direction indicated by the position of the Rotation Lever and gearshift. Slidestepping allows a VT to avoid incoming enemy fire, as well as reset the balancer (see below for further discussion). Slidestep capability is limited to the amount of battery power available. If the battery has been depleted, depressing the slidestep pedal will have no effect. Thus, a balance between use and conservation of battery power must be learned. Override
Second and third generation Vertical Tanks have the ability to bypass the safety governors of their joint systems using a feature called OVERRIDE, available as a button on the center control block. When override is engaged, a VT may move faster, recover battery power more quickly, and recharge battery operated weapon systems faster. Override is not without its cost though. When enabled, fuel consumption occurs at 10x the normal rate, which can deplete a fuel cell in minutes, especially if slidesteps are being performed. Override should be considered a temporary tool for use in battle encounters or to facilitate quicker acceleration. It should be turned off when it is not needed. Braking and Reversing
Unlike the original Steel Battalion game, Steel Battalion: Line of Contact allows for quick downshifting and even changing into Reverse while rapidly moving forward without upsetting the balancer. Shifting into Reverse effectively puts the VT into a dead stop, when used in combination with the SLIDESTEP pedal (discussed below) the Reverse gear can be used for close combat manouevers. The BRAKE pedal is used rarely in Steel Battalion: Line of Contact but can be effective for slowing a VT without the severe loss of torque downshifting would entail. Braking can also be used in concert with the Reverse gear to immediately halt all forward movement. Balance
Vertical Tanks have advanced balancer systems which automatically compensate for most pilot manuoevers and terrain obstacles. However, overloading a VT beyond STANDARD weight allowances or performing extreme manouevers can exceed the balancers ability to compensate and the VT will tip. The OS will attempt to warn a pilot of a potential balancer overload by displaying "BAL" on the cockpit HUD, as well as lighting the Balancer Warning lights. If caught in time, the balancer can be reset by either straightening out of a radical turning manouever, or using a slight tap on the SLIDESTEP pedal. Falling Down and Righting a VT
In the event a VT tips, simply depress the ACCELERATOR pedal to initiate a RISE back to standing position. The gear shift should be returned to the 1st gear in order to being movement again. Note that the VT must be fully "stopped" before it can stand up. The interval required to rise to a standing position varies based on the VT model currently piloted. The stand up time is based on the VT animation. In general, light class VTs stand up quicker than heavier VTs. Enabling override will also give a slight assist to decreasing the stand up time. View Control
Beyond movement, piloting a Vertical Tank requires constant surveillance of the surroundings, both for navigation and target acquisition. External views are transmitted to the VT cockpit by means of a remote camera system, mounted near the top of the VT main body chassis. The camera direction is controlled via the view-hat thumbstick control on the left joystick. The camera has a 180° field of view from side to side, and approximately 150° up and down. The thumbstick has a "click" switch which will re-center the view to the centerline of the VT body faced direction. It is very common to be moving one direction, have the body of the VT (and weapons) aimed another direction, and the camera view facing a third direction. This level of control is both enabling and confusing, but quickly becomes second nature given sufficient practise. Equipping and Firing Weapons
At the most basic level, Vertical Tanks may mount two types of weapons, Main and Sub Weapons. Generally, Main Weapons are mounted to the "shoulders" of a VT, but there are exceptions. Similarly, Sub Weapons are generally mounted to the underbody chassis or reinforced shoulder mounts depending on type. Each weapon mounted has a specific weight value which is additive. Each VT has a standard (STD) and maximum (MAX) weight allocation. A maximum of three Main and three Sub weapons may be simultaneously mounted, but generally the maximum weight limitation will prevent all potential slots from being filled for a given loadout. Note that certain weapons are considered FIXED and do not add to the weight loadout total of a VT, nor may they be removed. A detailed explaination for every weapon in the game, plus testing results and image data is available on the Weapon Information page. Configuration of weapons, fuel tanks and optional parts is discussed in more detail on this page. Weapon aiming is achieved with the righ control joystick, which moves the reticule on the Main Monitor. When the reticule is outside the currently viewable area of the Main Monitor a directional arrow will display indicating the relative location of the aiming reticule. Enemy units swept over by the reticule will cause the aiming reticule to change to a red colour and a beeping tone to sound. An automatic lock can be enabled by pressing the LOCK ON button when an enemy unit is roughly targetted. The lock can be disabled by pressing LOCK ON again. Main Weapons are fired via the MAIN WEAPON trigger under the thumb on the right joystick. Sub Weapons are fired via the SUB WEAPON trigger under the index finger on the right joystick. Since enemy units do not show on the radar multi-monitor display, a pilot should constantly sweep the horizon with their reticule in an attempt to pick up enemy VTs. It should be noted that VTs in "stealth" mode will not register through this tactic. Stealth mode can be enabled by turning all the toggle switches on the Left Block to the OFF position. When stealth mode is engaged, a VT is incapable of movement and cannot fire weapons. Additionally, the oxygen supply in the cockpit will run out in 2 minutes if the switch is not toggled back into the ON position momentarily, which will result in a pilot death. The currently active Main or Sub weapon can be changed at any time by pressing the MAIN or SUB weapon change button on the center control block. Weapons may "cycled" passing over other active weapons by repeated button selections. Depending on the weapon type and location, deployment time may vary. In general the "third" Main weapon takes longer to deploy/stow because it is stored on an auxillary rear weapon mount. Main weapons "1" and "2" can be quickly switched because they are deployed by default on the right and left "shoulders" respectively. This is something to keep in mind when configuring weapon loadout and placement. Sub Weapons will deploy based on their type and location. |
|||||||||||||||||||


